Monday, July 27, 2015

Simplicity 1091 Part 4 - Poison Ivy Skirt & Gauntlets

Everything for the Simplicity 1091 pattern is officially complete! The costume, however, is still not finished. Since I opted to do a different top from this pattern I still need to make that and a backpack to store all my things in. Plus add leaves to the corset, hood, and gauntlets.

The Skirt - 

The skirt was fairly easy to complete. Just two pieces sewn together. Thankfully there was an elastic waistband and not a zipper. And that the hem just needed bias tape instead of a proper hem. This made things take way less time. 

I started by using french seams to combine the two skirt panels. The top edge was turned down 3/4" and then 1/4" to create the casing for the elastic. This part was the most annoying and difficult because of the curve. I wish the pattern was for more a circle waist than an oval. I sewed all the way around except for a small one inch section so I could thread the elastic through. Once the elastic was inserted, I tried the skirt on to make sure that it fit and then adjusted the size of the elastic to where I thought it was comfortable. 

I stitched the elastic together and then closed the opening by machine. Then I tried making the gathers in the skirt even on both sides of the seams. The elastic was then sewn down vertically where the two seams are so that the elastic does not get twisted. 

The bias tape was then added to the hem and the skirt was complete!


Gauntlets - 

The gauntlets were the worst part of this entire costume. I looked at the pattern piece and thought, "there is no way this fitting my arm." Maybe I have small forearms. The pattern piece is a trapezoid with the size lines on the sides of the pattern. The top and bottom are not adjustable. This piece was almost 3 inches longer than my forearm! So I used tracing paper to make pattern that I could cut up and manipulate to fit my arm. I resized the length but the width was also a problem. It was way too wide for me. I had gotten the pattern size 14 - 22 and the 14 still had to be reduced by an inch on both sides! I have medium sized wrists, according to the Microsoft Band watch thing, so its not like I have unusually thin forearms or anything.

My first attempt put the pattern at 1/2" below the 14 line for the width. I thought this would be okay even though the paper pattern was still a little big. I went ahead and made the gauntlet and it was a massive failure. It was overlapping by an inch and the grommets looked terrible because there was not enough material to support them closing all the way when installed. So I tried another 1/2" on each side and it was still overlapping but just barely. 
 
Differences between patterns. My pattern also loses 5/8"  on the sides for seam allowance.

At this point I also had run out of bias tape. It said 5 packages were needed and I didn't throw away any huge chunks leftover from the other times it was needed. TIP: Buy 6 packages. So I scavenged the bias tape from the first attempt and just barely was able to make it work by only putting bias tape on the top and bottom.

I cut out two layers of canvas instead of one and lined it up with the top green twill with right sides together. I sewed a 5/8" seam on both sides and left the top and bottom alone. This took care of my problem with it being too wide since even my last adjusted 1/2" was still too big. I trimmed the seams and then flipped it right side out. I pressed the edges and then top stitched them. Then I drew the lines for the boning and sewed them down.


I sewed the top bias tape on and then inserted boning and left a 1/2" gap from the top to apply the bottom bias tape. 


 Then I marked grommet placement which had to be adjusted since the pattern was remade. I wish I had put them just a little bit further in and wish I would have done 6 instead of 5. But that was my fault and not the patterns.


I tried it on again this time and it fit perfect! I was so glad to get this out of the way finally!


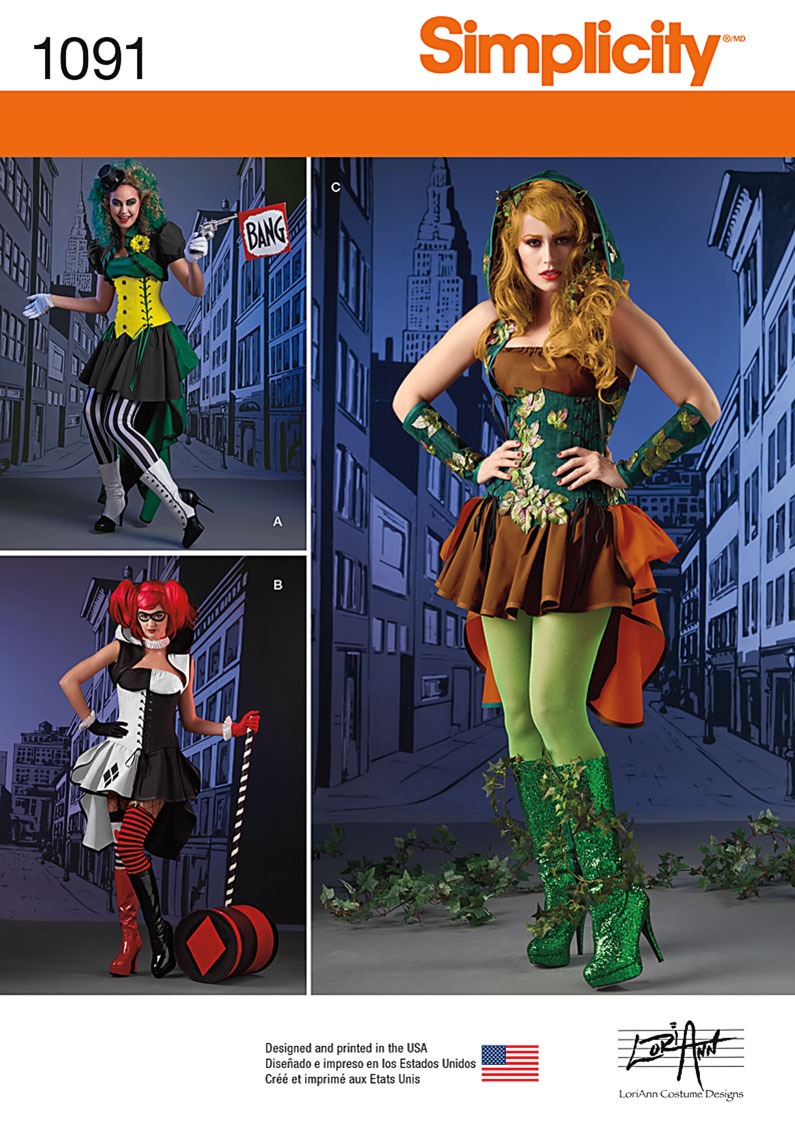
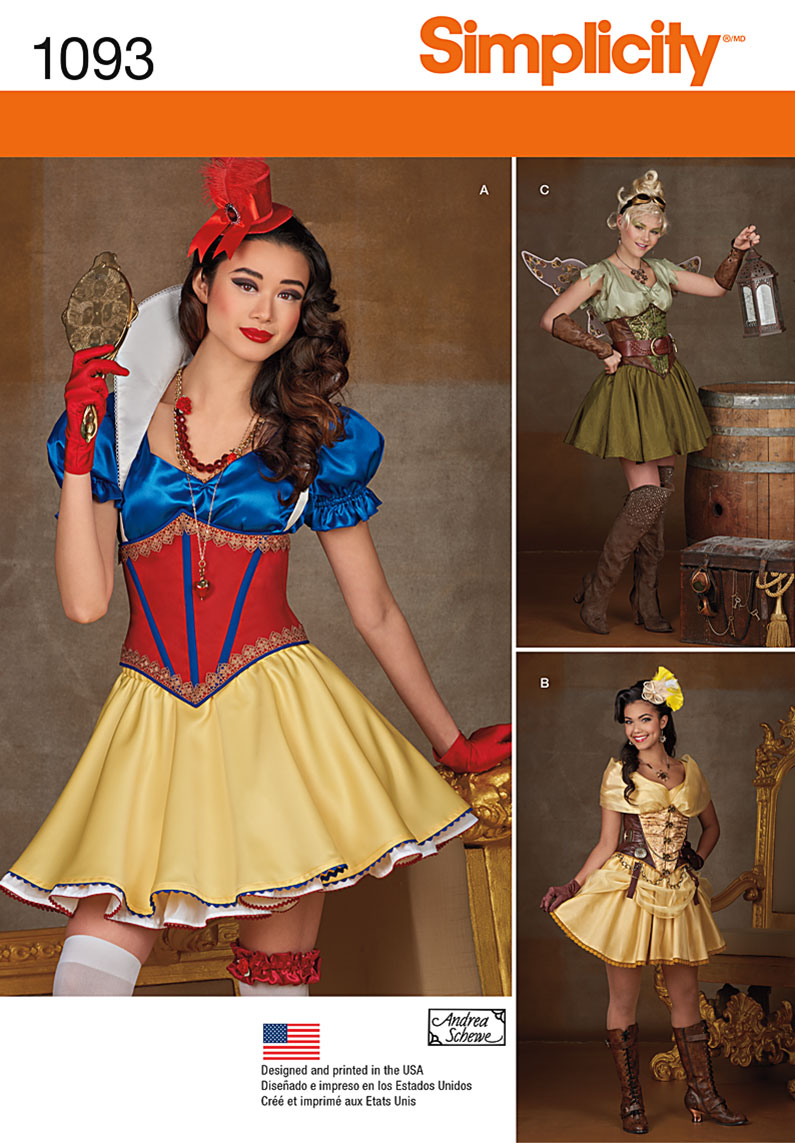
Next I should be working on the shirt from Simplicity 1093. The possible plan after that right now is to make the Harley version of this pattern for a friend.  If/when that happens my plan is to make in depth reviews like this for the parts that are different and to just add progress updates of pieces that are the same, like the bustle and skirt, and note anything different done for that.

Parts 1, 2, & 3 can be read through their respective links.

Thanks for reading!!


Preview of the mockup of the top using Simplicity pattern 1093.

Wednesday, July 22, 2015

Simplicity 1091 Part 3 - Poison Ivy Bustle


Yesterday I quickly was able to put together the bustle piece of the costume. It still took most of the day but that is a considerably less amount of time compared to the other pieces so far.

The most difficult part about this was trying to understand the directions for folding and that was only because I have never made a bustle before. There are two main center pieces that fold but only one set of side pieces and I kept trying to figure out why I was missing those dots until I realized that that is how the draping was supposed to look. Silly.

I started by attaching the side pieces to the middle piece. For this I used french seams and I cannot stress them enough. They just look so much better than anything else that could be done. The directions do not call for them, but I feel like it is much better if they are used because it will improve the quality of the garment. French seams will hide the raw edges, prevent visible fraying, and look better than serging the ends.


After the pieces were sewn together I attached bias tape along all the edges except for the top.


When all of the bias tape was sewn on I turned down the top one inch and pressed it. Then I took the very top edge and turned it inward 1/4" and then folded the whole thing back where the one inch mark was. I sewed close to the 1/4" seam to create a casing for the drawstring.

Then I laid it flat on the ground and marked out my dots and lines for folding. I am going to go through the steps for how did the folds just because to me it was confusing at first and then got easier once I got a visual. (Looking back I don't know why it was confusing.)


The directions say to pull up and tack the fabric in place. I took this to mean sew a tiny spot and not the entire fold line. That may be overthinking to sew the length of the fold line but who knows what they really want sometimes with these patterns!

So I started from the bottom like it says and folded the line and brought it up to the lower center dot.


I tacked that down by making a few stitches to secure the fabric in place. Then I folded the next dot/fold line and brought it to the upper center dot and secured it in place.


This only left the two side dots to be folded and brought up to the top dots. After doing so and securing them with stitches the bustle was done. I chose to leave the draw string section adjustable instead of measuring where it needed to go and then securing the tie in place. I wanted to be able to bring it in more or less depending on who was wearing it. I really don't know why this part couldn't be a one size fits all deal.


I took pictures of this with the bustle being both under and over the corset just to show off how it looks without something smushing the top down.


With the corset over the bustle.


I was thinking about making the bustle longer thinking that this one would be too short but I am glad I didn't. I am short enough that this is long on me.

I have started working on the skirt so that should be my next post with possibly the gauntlets and then that it it for the Simplicity 1091 pattern since I am not making the top that goes with this pattern. The pattern for the top I am using will be Simplicity 1093 - the Snow White top.

Thanks for reading!!

Part 1  Part 2  Part 4

Monday, July 20, 2015

Simplicity 1091 Part 2 - Poison Ivy Underbust Corset


After about a week worth of work the corset is finally finished. I love this corset. I love the fit, the style, and the amount of support from the boning. The construction was easy enough but the finishing was more aggravating than it should be. I will be going through my process of making this and the thoughts I had about the corset construction and instructions from the pattern. This corset is made using the Simplicity 1091 pattern by Loriann Costume Designs.

I cut out all the required pattern pieces beforehand. After an annoying and disastrous attempt at making the gauntlets I decided to focus on making the corset instead. One of the main things that was wrong with the gauntlets that would carry over to this corset was that the material was not thick enough for the grommets. The one piece of canvas lining and then the outside fabric was not enough make a good close with the grommets I was using. So to fix this I cut out a second layer of canvas to add.


This image is of the center piece after I sewed around all the edges but the top and then clipped the edges and corners and added notches on the curves. I turned the piece right side out and pressed it. After that I drew out all the boning channels. The boning I used was industrial zip ties. They are cheaper and work well for what I want. They are, however, slightly larger than the 1/4" boning that is required. This caused me to adjust the boning channels widths to fit them. It was not a problem but it did take longer than just copying the lines from the pattern.


Once they were drawn on I sewed all the boning channels down. And made adjustments for the grommet placing. That also brings up another point about this costume. The required grommets are HUGE. There was no way I was going to put those on my piece. I looked at the grommets compared to the piece and there was barely any space to fit them. So I opted to use smaller grommets which in my opinion would look better than huge holes in the corset.

I added boning by measuring out how much I needed and then trimming them own 1/2 an inch. This brings me to my most enraging aspect of this costume. The bias tape trim. Why oh why did they choose 1/2" That is huge! At least for the edges. I did not like this look. And the way that they describe it is worse. It made no sense in my head or how I was supposed to install it.

Step 9 says to baste the top edge down. It doesn't say how far. But if I went as far as the seam allowance I would have run into a grommet placement. So I went 1/8th from the edge just to close it. Its the only thing that made sense. It says to cut down the seam allowance but doesn't say how much and if I did I would have run into the same issues with the grommet. So I just left the seam and didn't cut it.

Step 10 says to iron bias tape flat and then in half. Then step 11 say to pin 1/4" from the top and sew on. It again doesn't give a seam allowance. I tried to see how it would look by guessing and the bias tape would be so thick of a band it didn't look good. Just trying to explain how this wasn't working is getting me all frustrated again.

So I improvised. I placed the edge 1/8" from the edge of the corset and then sewed it down just before it reached the boning using a zipper foot to make sure I didn't hit any of it by accident. Then I ironed it flat and understitched close to the edge. Since there was so much of the tape left over I ironed it in half where the raw edge met the raw edge of the corset piece and then folded it again to meet the line of stitching on the back side. This way I could ladder stitch/whip stitch the bias tape to the back.

I got better pictures of the sides for the next few pictures than the middle so they will be used as the example on how I "fixed" the bias tape issue.

Pinning the bias tape down 1/8" from the top.
After being top stitched and folded over it looked like this. I didn't want this big of a band!


So I folded it over to make the edge smaller and then folded it down to meet the stitching lines.
When sewn down it creates a much more pleasing accent line.
After I was finished with the corset middle I started on the sides. They came together pretty easy and had only the same problems with the bias tape that the previous section did.

Once the bias tape was all sewn on I worked on the grommets. I had to move the placement of the grommets because they would not fit where their original placement was. There was an inch gap between the edge boning and the piece was was to be 1 1/4 (1 1/2 for my measurements) from the edge so I placed the dots for the grommets on the same level as the old placement but put them halfway between the 2 pieces of boning. Once I expanded the holes to fit the grommet I used an anvil and my grommet setter to hammer the pieces together. Pro Tip: An anvil is WAY better to use than the floor or table. The grommets I did before looked like crap compared to the ones I did for this corset.

I laced everything together and it fit perfectly. I wish I had made it in a smaller size just because it is too close to my actual measurements and if I were to loose any weight it wouldn't fit anymore.

Overall my complaints about the construction are easily modifiable. But to sum them up:
-The grommet size suggested is too large
-The bias tape should be smaller
-The directions on applying bias tape need to be clearer
-I think its weird that the pattern wants bias tape on the top of the center piece but on the bottom of the edge pieces. Be consistent.
-Two layers of canvas are superior to just the one suggested.
- The placement of the grommets originally should have been further set back. If I had not used 1/2" boning channels and used the 1/4" as suggested it still would have put the grommets bumping right next to the boning.

Despite all those things I do plan on making this again for possibly a Green Arrow costume. 

Anyways here are finished pictures of the corset. Once the whole thing is together I will figure out leaf placement as I said before. And don't mind the white streak on the center piece. I tried to erase a line I drew and I guess the eraser on the pencil was bad and left a white mark that won't come out til I really work on it.


Part 1, which is making the hood, can be read here and part 3, making the bustle, can be read here.

Thanks for reading!!

Monday, July 13, 2015

Simplicity 1091 Part 1 - Poison Ivy Hood


Simplicity just came out with some amazing new patterns! I was so excited I grabbed them as soon as I saw them. I mostly wanted them for the pieces and not the overall costume. Since I'm not a pattern drafter I could use the pieces to build on for future costumes. I loved the particular corset style of the Lori Ann patterns (Dalek/Tardis and DC Comics Villaness). They are long in the torso and that is exactly what I wanted.

The more I looked at the patterns the more I actually fell in love with the Poison Ivy costume. I was thinking of making a steampunk outfit using a mix of the Dalek corset and Joker outfit but I have a special bond with red headed characters and couldn't get the idea out of my head.

I chose to make the costume more similar to Lori Ann's color scheme than the colors on the package. I also didn't like the top that came in the packaging. I plan to use the Snow White top in the Simplicity 1093 pattern with some sleeve alterations.

My local Joann's was closed for the weekend due to a water leak so I drove to Hancock Fabrics to get my supplies. This turned out better because I was able to go by Hobby Lobby and get some grommets (I'll need 70 of them!). They have a better selection than just gold or silver. I also like the Royalty Broadcloth from HF better because it is softer and I don't see as many imperfections in the weave like I do with the broadcloth that's about the same price at Joann's.

For the hood I used hunter green twill, black canvas, and red broadcloth. I ironed all the fabric and cut out the pieces.

I sewed together the lining first and ironed flat the seam and made markings for folding the pleats.


I did the same with the green twill and attached the two pieces together. I formed the pleats and tacked them down and then sewed on the bias tape for the hood opening.


Next I assembled the hood band which will connect to the corset later. I sandwiched some canvas between the two strips of red and green and basted all the edges. On the lower edge that doesn't connect to the hood I sewed bias tape. Then I matched the notches on the hood and the band and basted the two pieces together. Bias tape was then sewn over the remaining edge and it was finished!


The grommets should be installed at this point but I don't want to put them in until I have the corset finished and can accurately gauge where they need to go. I might need the strap shorter or just raise the grommet placement and tuck the strap into the corset. 

I will have photos of it worn and the complete costume when I finish it. But for now enjoy Betty modeling it for me. She is also modeling the Dalek corset mockup.


The hood reminds me of a venus fly trap. I will be adding leaves as embellishments later once the costume is fully complete. 

For part 2 click here!