Sunday, August 16, 2015

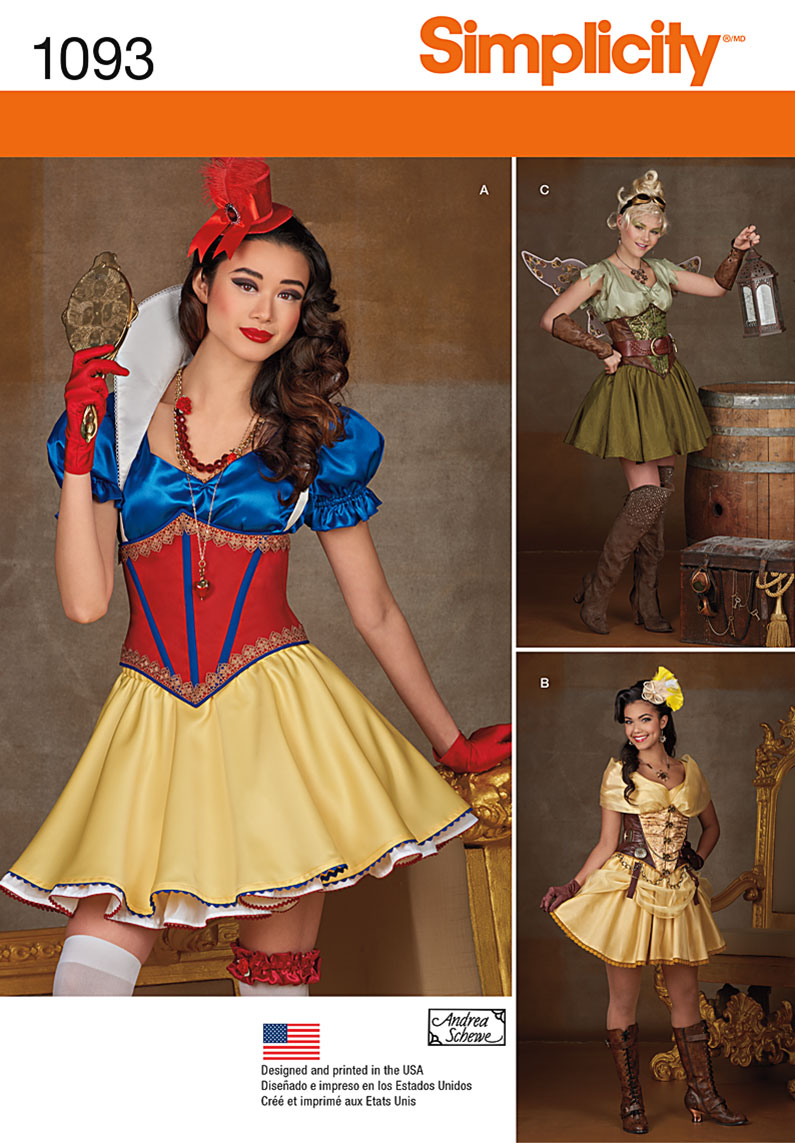
Simplicity 1093 - Snow White Shirt


The shirt for my Poison Ivy costume is finished! I had made a mock up of this in white and it looks really good with my costume but I think the green really pulls everything together.

This pattern is pretty easy to follow. The only thing I do not like is the neck facings. They wouldn't stay down and kept rolling up and showing. I tacked them down with a top stitch on the green version instead of doing the under stitch. The facings not staying flat might have been because I used a very stiff cotton on the white version.

If you make this in white I HIGHLY suggest adding two layers of the front piece. One layer is pretty see through so if you don't have something covering your breasts, or a bra on, people will see everything you got.

I modified the sleeve pattern to be six inches longer than the original. I don't like puffed up sleeves being that short. I like my biceps covered. I will explain my process for that later on.

The first thing I did was to stay stitch the arm holes, back collar, and shoulders.


The sides were then sewn up using French seams. Left the shoulders open for now so I could adjust them if the neckline was too low. On the first one I made I used the largest size to fit my bust but the neckline was too open. For this version I cut a size down for the neckline and shoulders but left the armholes and sides the original size.


A narrow hem was added to the bottom by folding it 1/2" and then 1/4" and sewing it down.


The shoulder seams were sewn together with French seams and ironed. 


Then I started working on the sleeves. I used the pattern and tracing paper to make a longer sleeve. At the arrows on the sides that show where to attach the sides together I drew a straight line. I also used my cutting mat to make sure the line was straight by lining up the arrow on the pattern.


I dragged the pattern piece down five inches making sure it lined up with my cutting mat and drew a line at 5 inches. 


Since the side seams are angled, to make the wide, gathered bottom edge, I used a ruler and drew a line out to each side so I could account for the change in width. 


Then with those drawn I lined up the pattern piece on each edge, matching where the red lines are in the picture above, and drew out the bottom and elastic placement line on each side and marked where they met in the middle. Now I had a new sleeve pattern.


Then cut out 1 1/2" strips of the fabric to make the elastic casing and fed it through my bias tape maker and ironed it. 


The casing was then pinned on the sleeve and sewn in place. 


I made a narrow hem, just like on the bottom of the shirt, on each sleeve.

Using my arm as a measurement, I cut the elastic to size. I fished it through the elastic casing and kept a pin on the end to keep it anchored while I gathered the fabric along the elastic. I basted both ends of elastic down close to the edge. 


Then I used French seams to join the edges.


I gathered the top edges between the marked lines and then sewed them onto the shirt. 


Now it was time for my least favorite part, the facings. I don't like them. I would have sewn this shirt with just two layers of fabric but I didn't have enough to cut out 4 top pieces. On the white shirt I made the facings where horrible. They didn't want to lie flat and when I put the shirt on they kept showing. Part of that was because I used such stiff fabric.

I cut them out and applied interfacing to them. Then I stitched them together using French seams.


 I ironed under a 1/4" on the outside of the facing and sewed it down.


I try to conserve the interfacing fabric as much as possible. Not because it's expensive or anything but because I don't see why I should throw chunks of it out when it can all be fused together. It's never seen and I've never had an issue from it being patched together.

I attached the facing to the collar of the shirt and stitched it down.


I cut notches in all the curves and then clipped the seam allowance down really close to the edge. This was because instead of under stitching I was going to top stitch. I tried it their way. It sucked and didn't do anything about keeping the facings tucked down. I have a couple of shirts from Target that I am planning to do this too because the facings keep coming out. It's very frustrating.

So I ironed the facing under and top stitched 1/8" away from the edge. It looks fine to me. Some people don't want to have the stitching line showing but it doesn't bother me at all. I also stitched the shoulder seams  to the facings to that they would stay pinned under there.


The last step was to gather the V point. I marked the spot where it was to start and then just fished a needle through with no specific length to the stitches. Then I gathered it down and tied it.


Here is the shirt with my Poison Ivy costume!


Thanks for reading!!

Friday, August 7, 2015

Simplicity 1091 - Harley Quinn Shrug


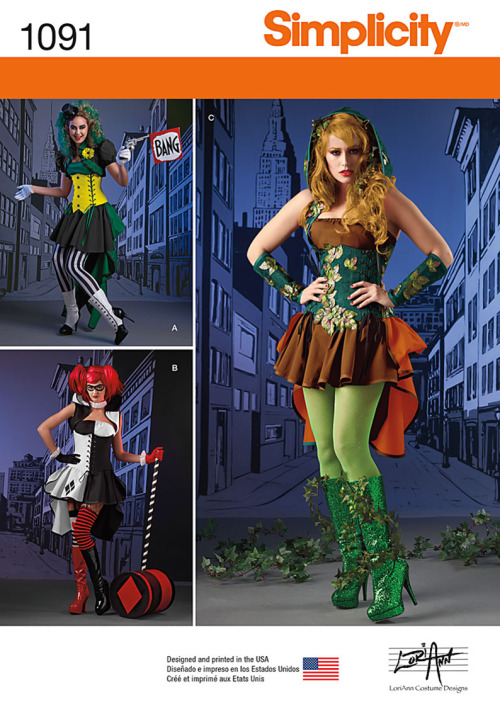
The shrug is finished! I used canvas as the outside and broadcloth on the inside for the lining. The pattern picture shows the shrug made using alternate colors for the hood and shoulder piece. I chose to make both sides the same color.

In this breakdown let me first inform you that there is a major problem with how this pattern was printed. This is not the designer's fault but I guess something screwy went on at Simplicity's end. The neckline and the side seam do not line up. I will explain in detail further down of how I solved this issue.
 ~

First things first, I cut out all the pieces and sewed in the darts and attached the shoulder seams on both the canvas and lining. This is where I noticed a problem. The back shoulder seam is wider than the front shoulder seam by about 1/4" inch. I proceeded to freak out and double check that I had cut the right pattern numbers out of the tracing paper. They both were the correct size. So then I thought maybe it was longer to attach the hood. I decided to just keep going and see what happens. Even though it kept nagging me that the instructions picture didn't show a gap.


I then attached the lining to the canvas with wrong sides together and stitched all the way around.
This picture clearly shows the difference between the collar and the front piece.


I attached the bias tape to the armhole and noticed the same thing as with the shoulder seams. The back piece was smaller than the front. I was so confused. I looked through the pattern instructions and it showed the pieces lining up. It didn't say anything about this gap. So, I emailed Loriann Costume Designs about it and I was expecting to wait all day for a response so I was supper happy when she emailed me back quickly. She said she sent them a size 10 and that the pattern company graded the pattern from there and must have not graded these pieces properly. I asked if I cut the excess off and she said that should be fine.

I am assuming that her size 10 will have no problems so if you are cutting that I wouldn't worry too much. For all the other sizes I would check and either cut the pattern down or draw a new one adjusting for the differences. I used the 14 - 22 size package and this particular piece was cut as a size 18. I checked all the other sizes included with this pattern and they don't all line up so you will have to do this for that package unless they reprint with corrections.

Here are pictures of the problem:


So I just decided to leave it and make the french seam for the sides and then cut off the excess.


I lined up the back and front pieces by turning it inside out. I matched up the bias tape just to make sure everything was even and then cut the excess off until it was even with the back. Then I clipped the edge off into a curve (the curve is where the black thread begins). I basted the cut section down again and the problem was solved.


Then I started making the hood the same way I did for the Poison Ivy version. Happy with that, I went to connect it to the shoulder piece. Yeah, that gap I was worried about...it wasn't for the hood. *sigh* It was just another section that didn't get graded properly. I'm assuming that the front piece was the problem since it was larger than the side but since I can't add fabric to something I cut off I decided to cut the neckline down. I had stitched the lining on at 1/4" from the edge so I trimmed the fabric down to meet that line of stitching. That was also exactly how much was over/under cut on the front piece so it worked out fine.

Then I attached the hood and sewed basted it down. I sewed the bias tape all around the raw edges and it was finished.


I won't be making the Joker version of this pattern so if you run into any problems with that shrug I suggest emailing her and not Simplicity about the problem and she can help. 

I really love how this looks and it is pretty comfortable to wear.

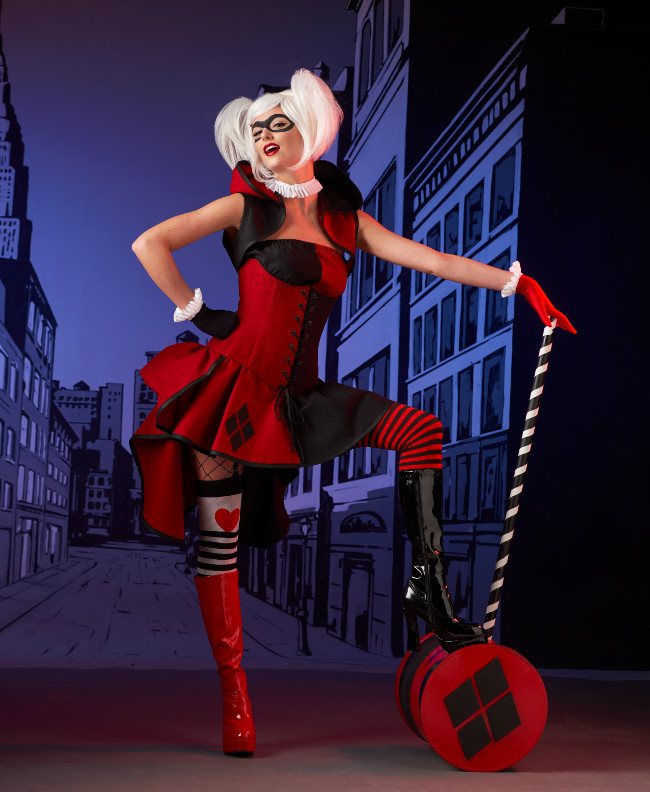
Here are pictures of the costume so far. All that is left is the corset now!


Thanks for reading!

Other posts for this project:
Skirt, Top, and Bustle
Corset

Wednesday, August 5, 2015

Simplicity 1091 - Harley Quinn Skirt, Top, & Bustle


I started working last weekend on the Harley Quinn version of this costume for my friend. This post is mostly just an update on the progress plus a mini review. I purchased all the materials for the project for about $50 at Joann Fabrics.


The skirt is the same pattern as the Poison Ivy version with the skirt cut from two different fabrics instead of one. I sewed it together with french seams and then made the casing for the elastic and put the bias tape hem on. With regards to cutting the elastic I recommend not using the elastic casing guide provided and just using yourself or your subject as the guide. I measured the elastic on the top and bottom using it and it was too large for my friend. I just wrapped the elastic around her waist and took a rough measurement and marked it with a pin. Then I fed the elastic through the casing and had her try it on. I still had to shrink both the top and skirt down so they were not falling off of her.

Speaking of the elastic, the elastic casing on the skirt is the bane of my existence. Well at least its not my favorite part to iron and pin and sew. The curvy parts right after the straights want to gather and pucker and make me mad. I get it all done, but it is a time consuming process. At least for the 3/4" folded piece. When you have to fold the edge to 1/4" it goes by much nicer and easier. However, I love this skirt. I love the length and shape.

For the appliques on the skirt I used regular felt instead of the fusible kind. I cut them out according to the pattern and drew out their placement on the skirt. Then I pinned them down and sewed very close to the edge. I only used regular felt because that's what I already had on hand. I think it still looks really nice and works. If you don't want to see stitching lines then I suggest using the recommended felt.

  
The top was the quickest thing to put together. It is just two rectangles sewn together with a narrow hem and a 1/2" wide elastic casing at the top. As with everything else I used french seams to sew the pieces together. Since the top has different colors, I changed thread while sewing the hem and casing to match each section. I did this with all three pieces for this costume. 


The bustle was super easy. I finished that in about two hours all together. It went faster than the first one because there is only one seam instead of two. I had no problems with this. My only recommendation is to use a french seam since it looks better and will encase the raw edges.


 Next up will the the shrug/hood for this costume. 

Thank you for reading and have a great day!

Monday, August 3, 2015

Simplicity 1388 - Drawstring Backpack - View D


I decided to make this backpack as an accessory for my Poison Ivy costume. The main place I am going to wear this outfit to is the Texas Renaissance Festival and we usually end up needing to carry quite a few things. Last year I made a small drawstring bag to fit wallets and phones in but I want something that I can maybe carry my camera in.

Another idea for this backpack is to use it as part of a Robin Hood/Green Arrow costume by putting some Velcro straps inside to hold some arrows straight so they stick out of the top instead of making a real quiver. Also the Velcro will keep the arrows out of the way of other stuff in the bag.

It took most of the day to cut out all the pieces. I guess I'm a slow cutter. But then I started working on the front pocket. I used twill that matches my corset and hood as the outside and black broadcloth as the lining. The directions were fairly simple. When making the flap for this pocket it says to put the lining and outside together and then sew on the Velcro. I didn't want lines showing on the outside of the flap because I thought that was tacky. So I sewed the Velcro to the lining and then assembled the flap per the directions.


I followed the instructions the same for the side pockets. I did have one problem where I fused the interfacing to the wrong side of the fabric. Ooof. I was being so careful too I thought.


Then, using a ruler, I measured and drew out the placement of the pockets onto the large rectangle that was the front of the backpack.


I pinned the parts on and sewed down the flaps first. It is not a really fun task to sew around the corners of the pockets but I managed it and they only came out a little crooked.


I attached all the pieces of felt to the interfaced twill pieces. I also went ahead and assembled the top flap. I guess I'm just terrible at attaching bias tape because I kept missing pieces on the back. I really wanted the black trim otherwise I would have just top stitched it and called it a day. Maybe if I had done it as piping it would have come out cool too.

The next step was to pin and sew down all the straps. I made my own instead of using the webbing. For this I took 3 inch long strips of the twill one inch longer than the measurements given and interfaced them. Then 1/2" of one end was pressed to the inside and then the whole thing was folded in half with the right sides together. I sewed the edges down with a 1/2" seam and left the folded end open. I cut the corners and trimmed the seams and then flipped the tube right side out and pressed it flat. I didn't worry about closing the end and instead top stitched 1/8" from the sides of the tube. These where then used as the straps and attached to the back piece. I followed the directions for the D-rings exactly as it suggests.


I left them pinned there to keep them out of the way when I sewed the back and bottom on. I sewed the front onto the back and then started pinning the bottom on. It was too big. I am not sure why. This made me so mad. I checked that all my pattern pieces were cut out the right size and they were. So I did the best I could by pinning all the straight edges down and then worked on the curves and the front. I took the curved edges of the bottom and made a pleat in each and pinned it to the front. I sewed the bottom on feeling frustrated.


You'd never know it wasn't supposed to be there if I hadn't said but since I'm talking about construction I don't want anyone else working on this freaking out as I did when it didn't work right. And if you get yours to fit right let me know what you did right that I didn't. haha

The flap was then sewn together using the same methods as the previous flaps. I originally followed all the directions to make the buckle part using my self made straps as the webbing. THIS WILL NOT WORK THAT WAY. It makes everything too thick to sew through and too short to add the Velcro. So you are supposed to fold the strip in half and then fold the ends down 1/2" and sew all around it. If you use the self made straps like I did just fold the piece in half and then sew it down around all the edges. This will keep one end from being super thick. Then you take the piece and sew it normally at the stitch line and then insert the buckle and sew another line encasing the buckle. I suggest using a zipper foot to do this so that you can get pretty close to the edge. Then sew on the Velcro to the remaining piece of strap.

Take the finished flap and baste it onto the back of the backpack.

The next step was to make and sew the band on. Mine was a little larger than the circumference of the bag and so the middle just barely overlapped. If I make the bag again I will size it up before sewing the ends down so that doesn't happen.


When all that was finished I started on the lining and making the back pocket. This was pretty easy. I sewed the zipper onto the pocket piece and then ironed all the edge down 1/4".


Then I drew out the box where it was supposed to go on the lining. I sewed the zipper to the lining and then flipped the pocket over and pinned it to the lines I had drawn.


I made a modification to this piece by adding Velcro to the inside of the lining. This was so that if I used the backpack for another costume, Green Arrow, I could put arrows in the backpack to use as a quiver and still be able to carry around my stuff. I put the pieces on 3" from the top and 4" from the bottom. It was an arbitrary placement so if you do the same thing then put them where you want. But I sewed it with the fuzzy side against the lining and then the scratchy side against the back of that to make a loop. Love my technical terms? I have a picture of them at the end. The back lining then got sewn to the front piece and the bottom got sewn on again. I still had the same problem as before with the bottom so I just put the pleats in and sewed it down leaving a space open in the back of the bottom to pull everything right side out. Then with the lining still wrong side out I put in the backpack with right sides together and sewed around the top edge.


I pulled the backpack through the hole in the bottom of the lining and then, PRESTO CHANGEO, we had a backpack! I sewed the opening in the lining closed and pushed the lining inside. I cut a piece of cord to fit the opening and fished it through and added the cord stopper and knotted the ends. Then I sewed the other side of the Velcro to the bag so the flap would stay closed.


Here are some photos of the backpack on the costume:


This backpack is a great size and all of the pockets will hold a huge cell phone, like the Note 4, which is good since I might be carrying 3 of them. I love this backpack so much I might just use it this semester for school.

Thank you for reading!